
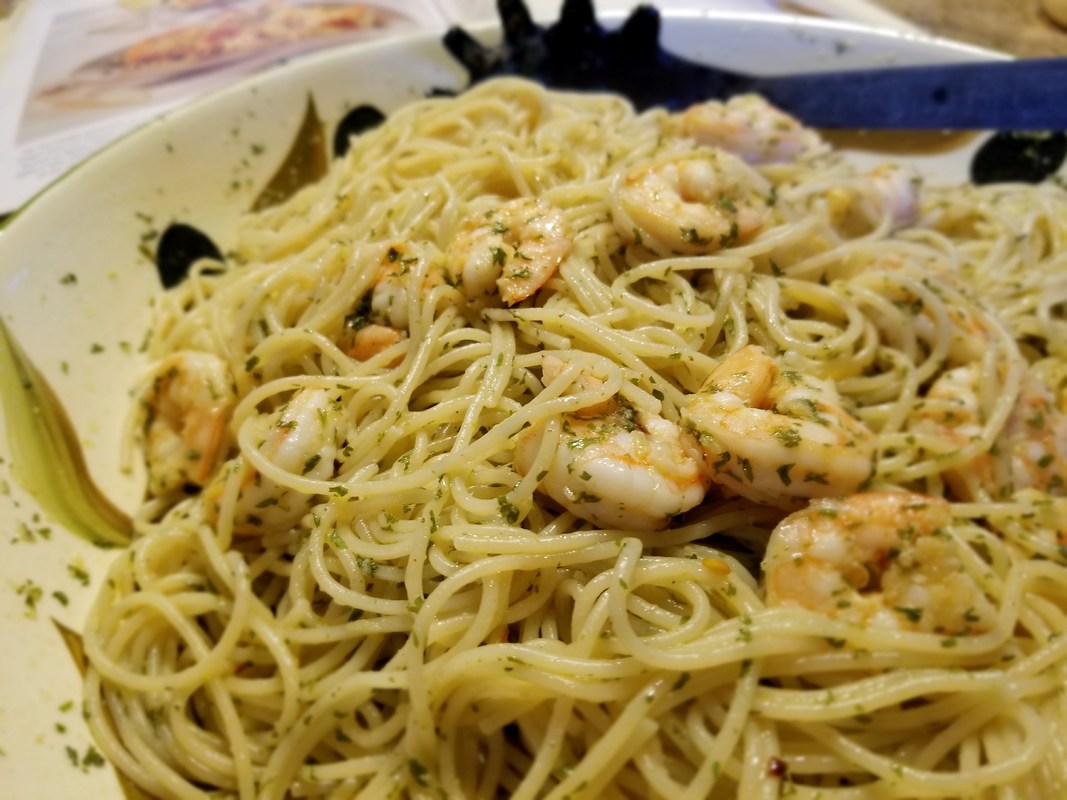
Is it just me or does winter just make you want to eat all the carbs? Throw in a pregnancy and I simply cannot be stopped. This weekend I had a craving for an old flame my husband and I used to enjoy on the regular pre-babies. As I was meal planning for the week, I wondered if my daughter might enjoy it too. I mean, it does contain all the good things: pasta, shrimp, garlic. What's not to love? Apparently the answer is nothing because she gobbled hers up to. And the leftovers (if there are any)? Don't even get me started. They're just as delicious as the original.
I've used both fresh and dried parsley in this recipe, depending on my desire to chop herbs. This week I was not feeling it so just used half the amount in dried. If you ever need to substitute, that's the rule: use half. It's because dried herbs and spices are more potent than their fresh counterparts. I also omit the salt in the recipe. But not in the pasta water; that's your one opportunity to season that shit. Don't miss it! Other than that, I follow the recipe exactly as written.
INGREDIENTS:
½ cup (125ml) olive oil 7 cloves garlic, minced 1 tsp (5ml) salt 1 pinch hot pepper flakes 1 lb (450g) large shrimp, peeled and deveined 12oz (340g) spaghetti ⅓ cup (70ml) chopped fresh parsley
DIRECTIONS:
Fill a large pot with 20 cups (5L) water and 2 tbsp (30ml) salt; cover and bring to boil. Meanwhile, in a skillet, heat oil over low heat; cook garlic, salt and hot pepper flakes, stirring occasionally, for about 15 minutes or until garlic is light golden but not browned. Increase heat to medium-high. Add shrimp to skillet; stir-fry for 2 to 3 minutes or until lightly pink and opaque. Fill your pasta bowls with hot water to warm. Meanwhile, add pasta to water, stirring to separate strands. Cook for 8 to 10 minutes or until tender but firm; drain and return to pot. Add shrimp mixture and parsley; toss to coat. Empty bowls. Spoon in pasta. Serves: 4
I first discovered this recipe in an old Canadian Living cookbook. It has remained a favourite at our house and will hopefully be making more regular appearances at our table.

0 Comments
Rowyn woke up with a phlegmy cough and snotty nose the other day. It's always hard with little ones as there isn't much they can take and they don't understand what is happening to them. I opt to let things like that run their course and personally try to limit the chemical concoctions I ingest so I am trying to do the same for my family.
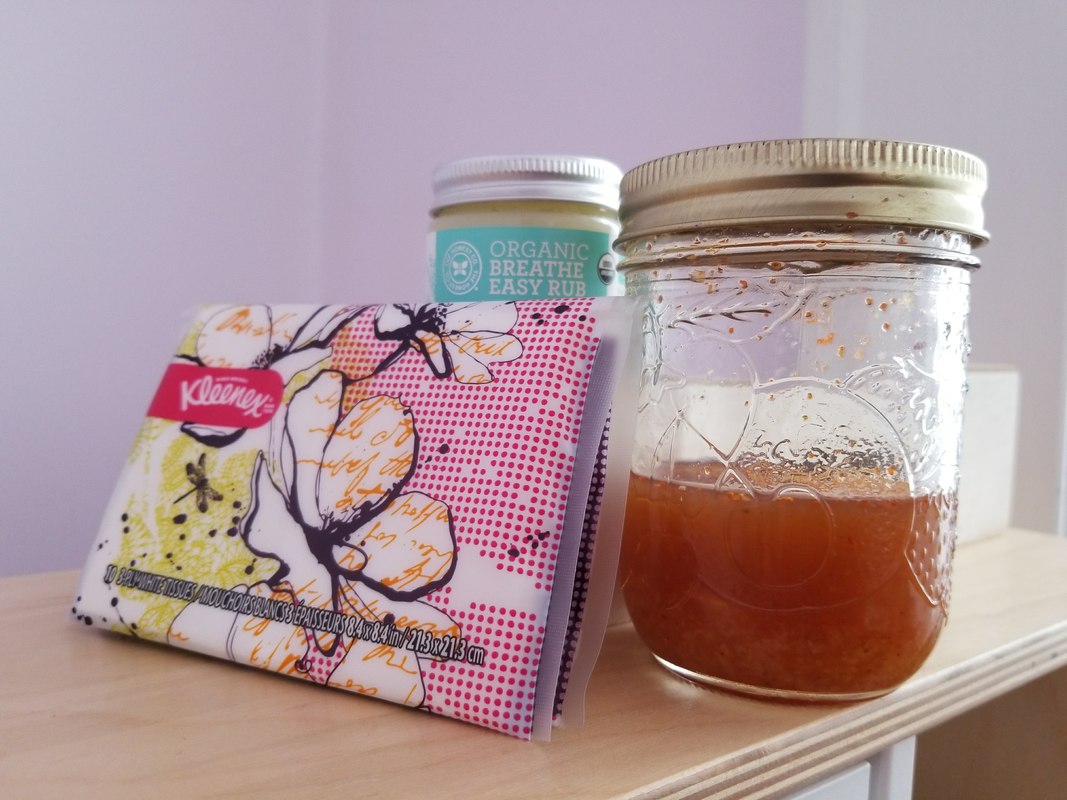
That being said, she needed to rest and that darn cough was keeping her up. So I used Mother Nature's heavy hitters and brewed this magic potion. It totally took care of the cough and congestion and left her feeling well enough to go about her day. NATURAL COUGH SYRUP
INGREDIENTS:
¼ cup (60ml) freshly squeezed lemon juice ¼ cup (60ml) raw, unfiltered apple cider vinegar ½ tsp (2.5ml) cayenne pepper 1 tsp (5ml) fresh grated ginger 3 tbsp (45ml) raw honey
DIRECTIONS:
Combine lemon juice and apple cider vinegar in a small sauce pan. Bring to a boil. Reduce heat and simmer for 2 minutes. Remove from heat. Add cayenne, ginger, and honey. Mix well. Let cool and store in a sealed container. Adults: 1-2 tbsp daily Children: 1 -3 tsp daily
Please keep in mind that I am not a doctor, nor do I play one on TV. This information is just to share what worked for us and should not replace the advice of your healthcare professional. Also, honey should never be given to infants under the age of one.
We used 1 tsp, three times per day on my toddler until her congestion cleared. My daughter requested seconds every time she had to take it, but did have to eat and drink with it; it is a pretty intense flavour combo but it works. What are your favourite natural remedies during cold and flu season? 
It's been a while since I shared a recipe around here. That first trimester of pregnancy seems to really kick my ass and puts cooking/eating very low on my list of things I want to do. As for the other three months, a lack of motivation was definitely the culprit. I have been struggling with how to manage my time between blogging, creating, caring for our toddler, and running a house. This is now one of my priorities for 2018: figuring my shit out. Or at least trying to.
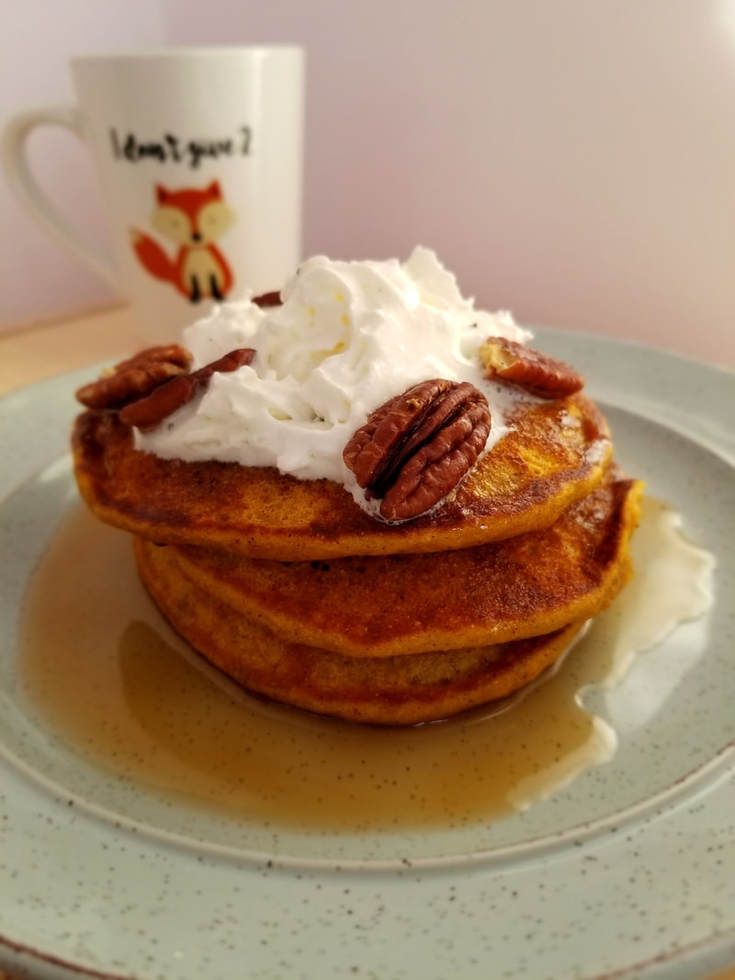
Along those lines, one way I try to maximize my time is by making the most out of a recipe when I can. Pancakes are no exception. I find that if I'm already making them, then it's no more trouble to double the batch and freeze a bunch so I have them on hand. Just lay them out on a cookie sheet between layers of parchment and pop in your freezer. To reheat, just toss a couple of these beauties in the toaster for a quick and delicious breakfast any day!
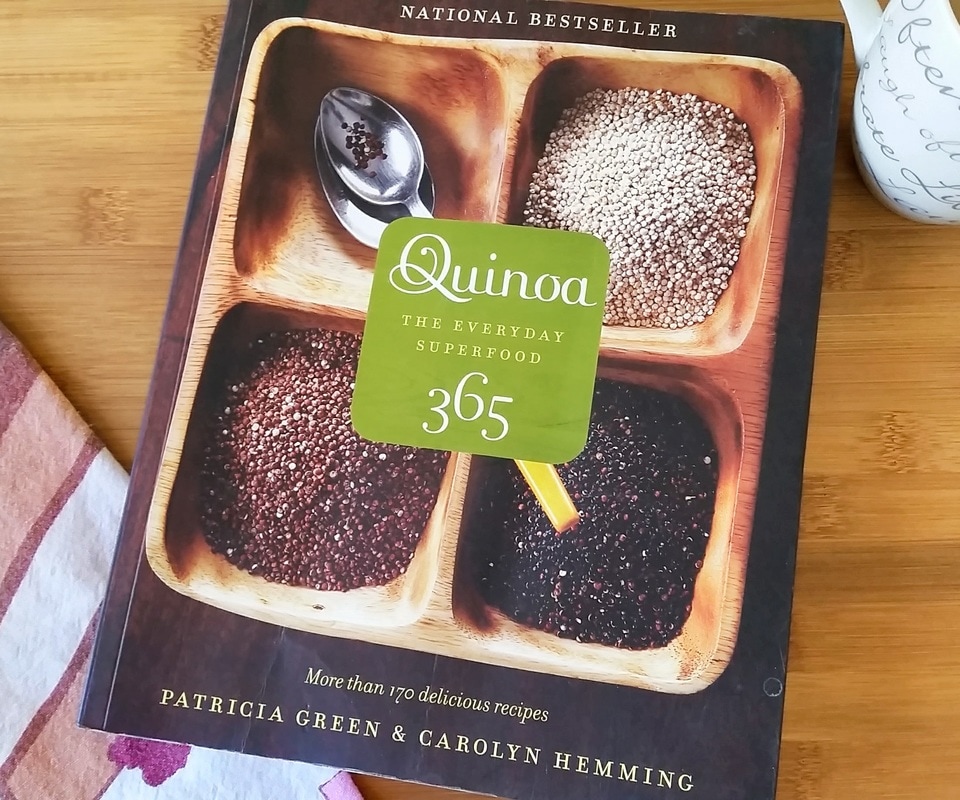
This is another recipe from my favourite Quinoa 365: The Everyday Superfood cookbook by Quinoa Sisters, Patricia Green and Carolyn Hemming. It calls for quinoa flour which I make myself by toasting quinoa and grinding in my Vitamix. The toasting gives it a nice nutty flavour that works well in this recipe. I also use a local Cold Pressed Camelina Oil in place of the vegetable oil. It adds another subtle note of nuttiness that pairs perfectly with those fall flavours. Around Thanksgiving every year I stock up on organic pumpkin purée so I have it on hand in our pantry. The brand I buy has enough purée to double this recipe so I don't have any leftovers.
DIRECTIONS:
Measure the flour, sugar, baking powder, baking soda, allspice, cinnamon, ginger, and salt into a large bowl. Mix well. Whisk together the milk, pumpkin, eggs, and oil in a medium bowl. Add to the flour mixture and stir until just blended. Grease a large nonstick frying pan or spray with cooking oil and place on medium heat. When hot, pour ¼ cup (60ml) portions of batter into the pan. Pancakes will be ready to flip when you begin to observe bubbles and the underside is brown. Flip and cook the pancake for another 20 to 25 seconds, until the center springs back when pressed. If the pancakes buckle when sliding a spatula under them, lightly oil the pan again for the next pancakes. Serve with maple syrup, pecans, and/or whipped cream. Yield: about 17 pancakes
These pancakes have become a staple in our breakfast rotation and are delicious with nut butter or with a splash of maple syrup for a weekend treat. After you're hooked, grab a copy of this national bestseller to see where else you can add a little quinoa to your life!

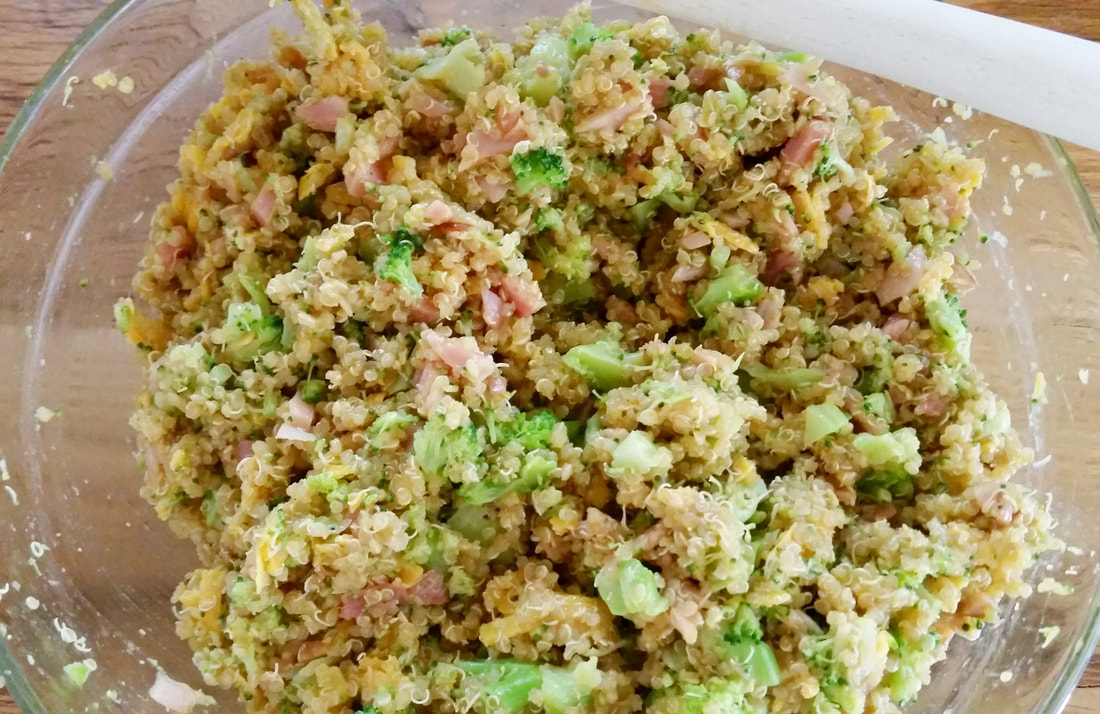
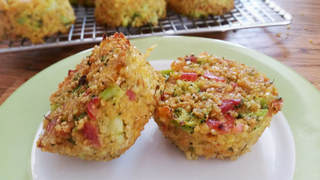
Quinoa bites have been on our menu since my daughter mastered the art of eating. They are portable, delicious, and full of all the good things making them a great lunch or snack. Plus, they're easy to make and can be frozen — two things I love as a busy mama. I tried many recipes and tested several baking methods to get these little bites to hold their shape and easily come out of the pan and I am finally ready to share the best recipe possible. Because nothing sucks more than wasting your precious mom-time making a dud.
I am sharing the recipe complete with all of my tried and true methods. This includes spritzing the pan with a bit of oil before baking and using a silicone muffin pan. I purchased myself a Kitchen Spritzer from Pampered Chef so I can use my own oils instead of store-bought aerosols. You can lightly grease your pans with whatever you like, but definitely lube them up. Silicone muffin pans are also a necessity. I grabbed one of each from Bed, Bath & Beyond and use them all the time for portioning and freezing meals. When it comes to baking, I normally prefer my metal pans but when I tried baking my bites in them, it ended in a sticking disaster every. single. time. So then I started rolling my bites but I found that messy and more time consuming. Now enter, silicone baking pans. Life changing. 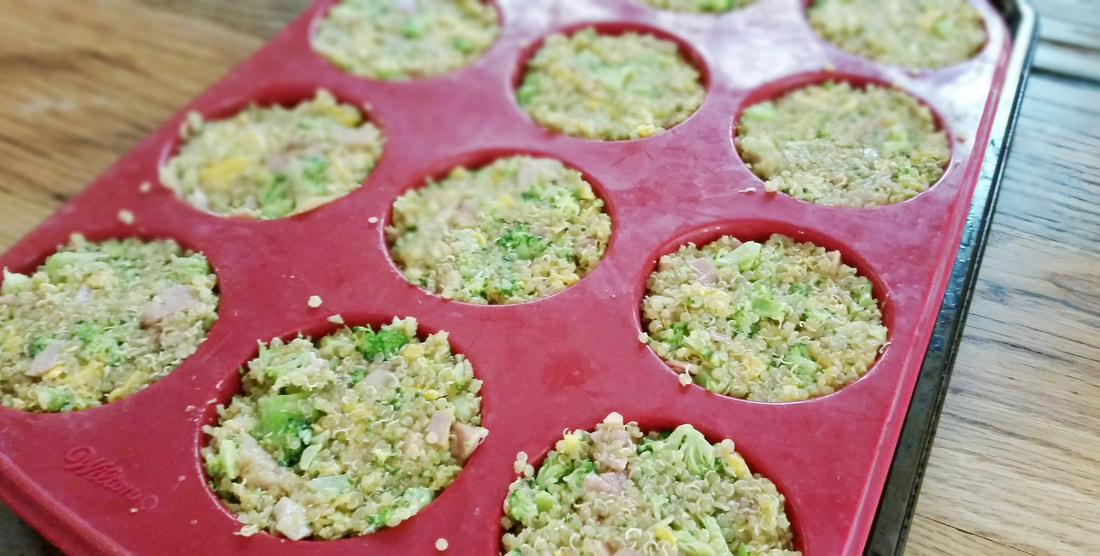
Choose a quality ham. I had been purchasing great deli ham from Dad's Organic Market but they are no longer offering deli counter meats. So instead I picked up a black forest ham and chopped it myself in my food processor with the slicing blade. Then I just had to do a finer chop with my knife. I bought a 600g chunk so I had enough to slice and freeze two additional portions for next time. When they're gone, I'll go one step further and try smoking a ham roast from Cool Springs Ranch now that I see how easy it is to slice on my own.

If you're looking for something quick to keep on hand for those busy days or to mixup school lunches, these are for you. And be warned, they are very delicious. If you make them mini, they are easy to just keep popping in your mouth!
DIRECTIONS:
Combine quinoa and broth in a medium sauce pan. Bring to a rolling boil. Reduce heat, cover, and simmer until all the liquid has evaporated, about 15 minutes. Remove from heat and let stand 5 minutes. Fluff with a fork and set aside to cool to room temperature. Meanwhile, place broccoli in a steaming basket over water. Bring to a boil, cover, and steam for 5 minutes. Remove broccoli from basket and cool to room temperature. Finely chop. Preheat oven to 350°F. In a large bowl, lightly beat eggs. Season with ground pepper to taste. Add cooled, quinoa and stir to coat. Add chopped ham and broccoli and stir until combined. Add cheese and mix well. Lightly grease a silicone muffin pan (regular or mini) and place on a cookie sheet for support. Fill each cup with quinoa mixture, pressing down to firmly pack. Bake for 15-20 minutes for mini bites or 25-30 minutes for regular, or until golden brown on top. Carefully place muffin pan on wire rack and let cool 10 minutes. Turn pan upside down onto rack and gently squeeze each cup to release onto rack. Wipe clean and repeat with remaining mixture. Make ahead and freeze cooked bites on a large cookie sheet. Store in freezer bags for quick lunches. Just thaw and/or reheat to serve. Yield: 2+ dozen mini or 1+ dozen regular 
We made it downtown today for Market Saturday. It's officially summer but the weather has been feeling more like fall. We even had a frost warning last night... in June! WTF?!? This morning started a little cool but warmed up enough to get out for a walk. The chillier weather worked in our favour and allowed us to snag two Do-Si Donuts: our favourite Seabuckthorn Berry with White Chocolate and the elusive Saskatoon Berry. We also tried a couple of new (to us) vendors.
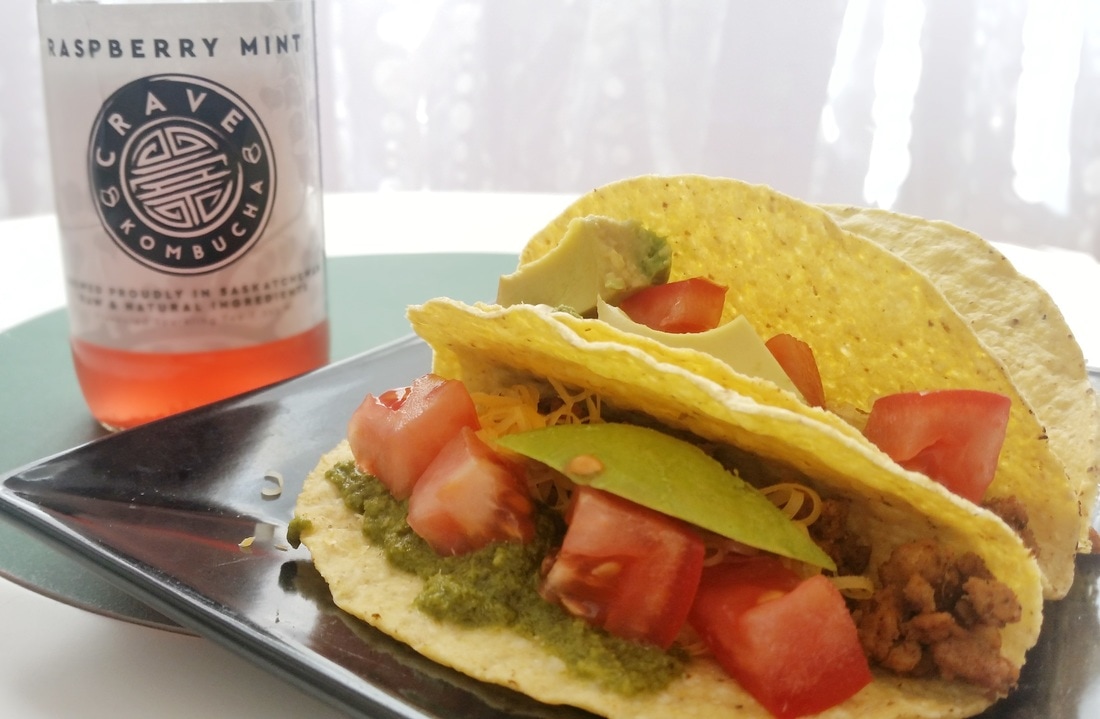
I recently tried kombucha for the first time. I bought a case of GT's Organic Raw Kombucha in Gingerade from Costco, which may have been a bit ambitious. I'm warming up to its zingy fizz and essence of apple cider vinegar but it is definitely an acquired taste. Despite my mediocre first impression, this morning I branched out and tried another brand from locals, Crave Kombucha. Theirs is not effervescent which makes it more like a tea than pop, and the flavours are delicious. The raspberry mint pairs the sweetness of raspberries with just a hint of mint. It's a new addition to their menu and is so refreshing. A must try. I also snagged a mango cranberry. They offer samples so you can stop by and try before you buy. But you will definitely buy. Crave is also available in select stores if you need to get your booch on mid-week. My second new purchase was a delicious Cilantro Sauce from Bina's Ethnic Foods of Nepal. The cilantro is fresh while the garlic gives it a punch. My friend uses it as a topping for eggs but I could put this on everything. And I started with my tacos this afternoon. This is definitely my new favourite condiment. Grab a jar and a bag of her Wo Mari (green onion cakes), too! Bina also encourages trying before buying, so pop by and sample her wares. Once you've got the cilantro sauce, you're going to want to make tacos, so allow me to introduce you to my taco seasoning. I love making my own spice blends so I can control what goes into them. Read the ingredient list on your favourite brand; if you're also wondering what ethoxyquin is, then try my recipe. You can omit the crushed chilis if your personal Scoville scale is low.
INGREDIENTS:
1 tbsp (15ml) chili powder 1½ tsp (7.5ml) cumin 1 tsp (5ml) ground pepper ½ tsp (2.5ml) salt ¼ tsp (1ml) garlic powder ¼ tsp (1ml) onion powder ¼ tsp (1ml) crushed chilis flakes ¼ tsp (1ml) oregano
DIRECTIONS:
Place all ingredients into a bowl and mix well. Brown your meat and drain off any fat. Add your taco seasoning and mix well. Add ⅓ cup of water and simmer until water is absorbed. Make ahead and store in an airtight container for up to six months. Yield: 1½ tbsp = 1 pkg store-bought
So many delicious options at our local market. Be sure to check these two out this summer!

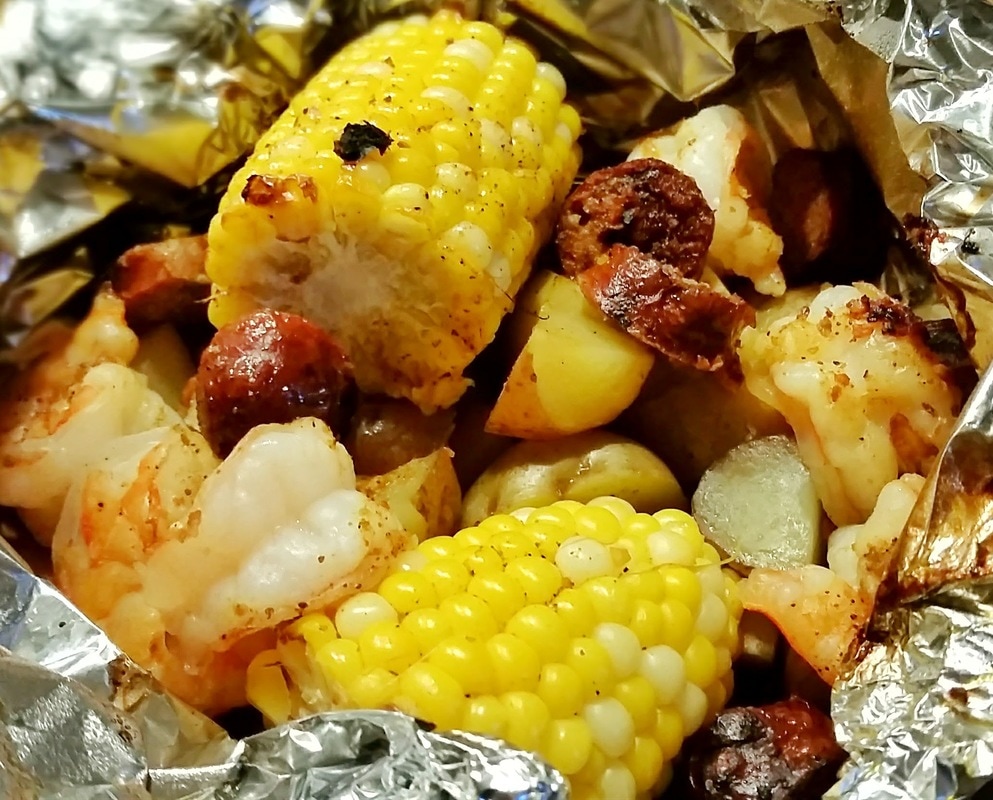
This little foil packet is a delightful bundle of flavour. It's so easy and yields next to no dishes which always earns big points at my house. Since I discovered it on Damn Delicious last summer, it has been regularly requested by my husband. I loosely follow the recipe and just fill each foil boat with as much of each ingredient that we have/want. Normally, I am unable to find the smoked andouille sausage so I just substitute with whatever deli sausage I can find. This last time I purchase two raw andouilles from the meat counter at my local Save-on-Foods and barbecued them while I prepped the rest of the ingredients. The extra spice was a nice addition.
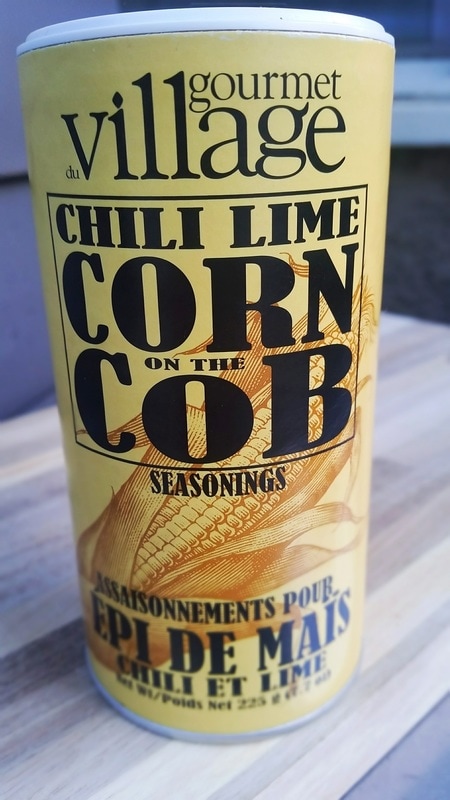
To finish, I drizzle with roasted garlic olive oil from the Oliv Tasting Room and sprinkle with this chili lime corn on the cob seasoning I found last year for Father's Day at Dutch Growers. I haven't seen it around this year but it is so good so if you come across it, grab yourself one!
Once everything is wrapped in foil, you just throw on the barbecue and let it do its thing. It really doesn't get much easier than that. Even better though is tossing a piece of foil in the trash for cleanup. The whole thing totally screams camping to me. I'll have to confirm when we take my sister-in-law's camper for a test drive this summer and see if we actually enjoy the great outdoors as a family. Or if you beat me to it, post your feedback below! 
Get the recipe: Shrimp Boil Foil Packets at Damn Delicious
Mexican flavours are a huge hit at our house. My two-year-old is into all things spicy, covered in salsa, and served in a tortilla. We have a few go-to recipes for meat including this slow cooked mexican pulled pork from Skinnytaste. I have made this roast a couple of times using a pastured pork picnic roast from Cool Springs Ranch. Seriously Sasky folks, if you haven't looked into getting your meats from this local farm you should.
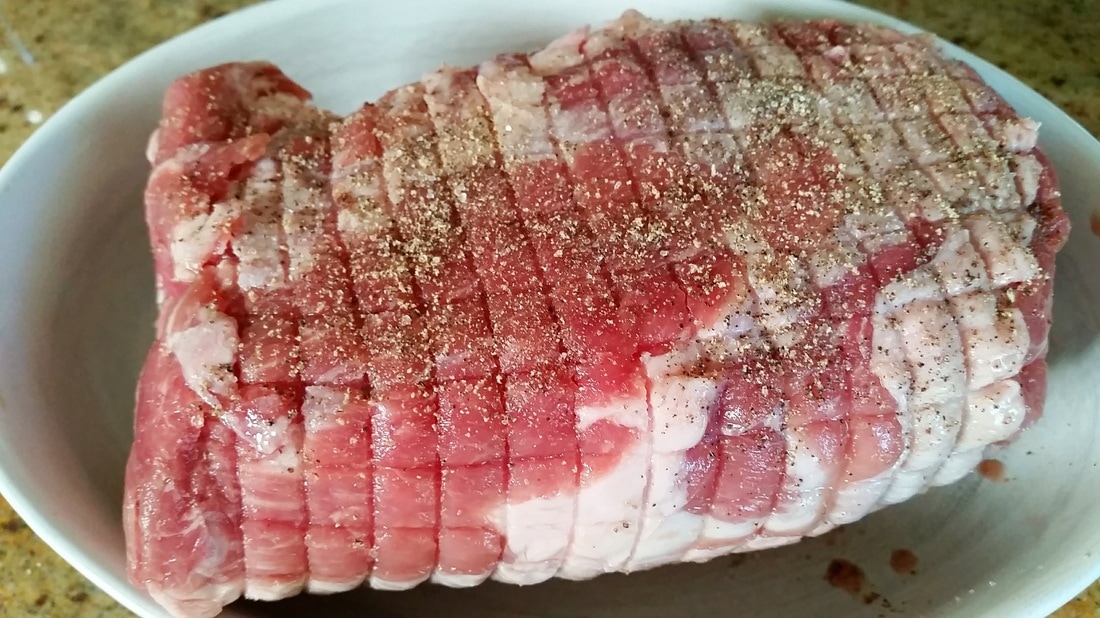
The first step to any good roast is browning your meat. This locks in the juices and builds flavour. Don't ever skip this step. Ever. You want your pan to be screaming hot so the meat sizzles as soon as it touches the heat. I never use a pan with a non-stick coating for this job. They're not meant to be used at high temps and I'm very leery about chemicals leaching into my food. Plus, your meat won't be sticking if you're searing it right. This brings me to my second tip: be patient. If you go to flip your roast and it sticks, let it be. When it is finished cooking, it will release itself from the surface, no problem.
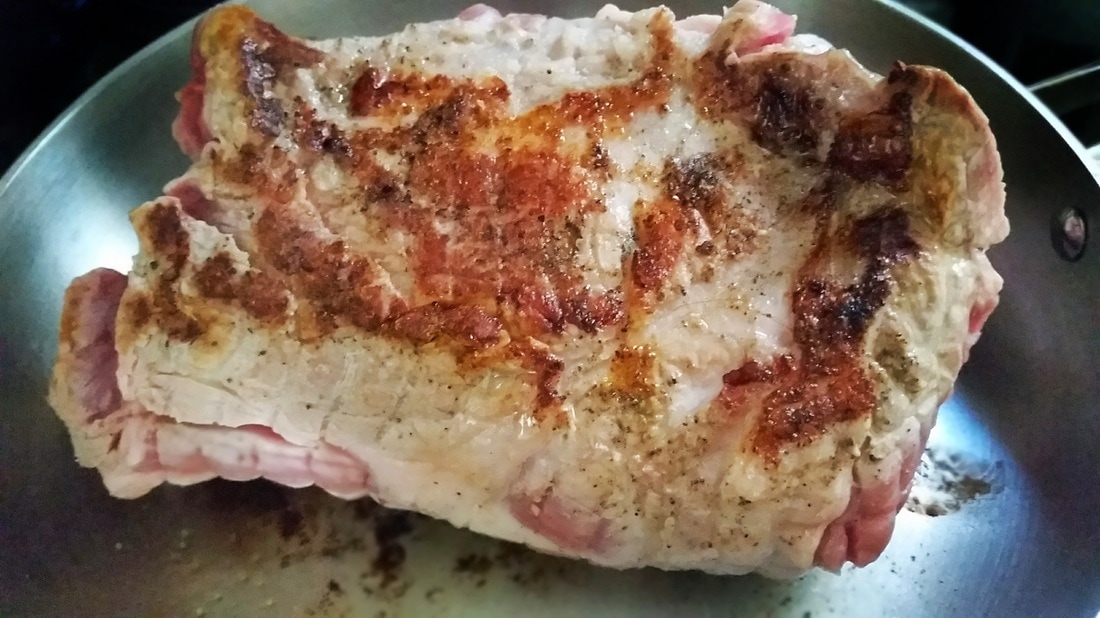
Once your pork is browned, you are going to season it. I made my own sazon and adobo seasonings. I try to make my own spice blends whenever I can so I know what's going in them and so I can control the salt. Side note: have you ever read the ingredients on those pre-made mixes? Ick. You can make up a batch and store in an airtight jar in your spice cupboard.
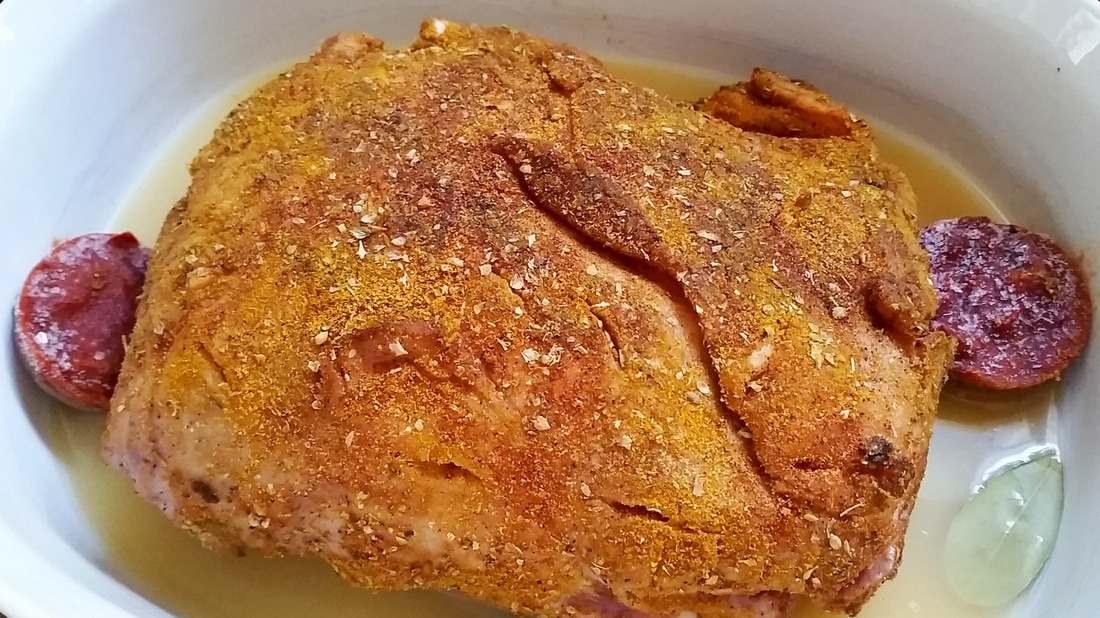
Once your meat is rubbed and stuffed with flavour, it's ready for cooking. Low and slow is the game here and I've found my slow cooker doesn't cut it. So what do I use? My oven. That's right. My Kenmore has a slow cook feature and there's a good chance yours does too. Since I started using mine, no more dry roasts. It provides a lower and more consistent heat than my actual slow cooker and has all the same convenient features, including a timer that will shut off the oven when it's finished. If your oven has this option, I encourage you to try it and let me know how you like it.
You may have noticed that my chiles in adobo look like frozen pucks. That's because they are. I have never encountered a recipe that required a whole can and I hate wasting, so I started freezing the leftovers all chopped and ready to go in my mini muffin pans to use later. Are you guys writing this shit down? I am on fire with my kitchen tips today.
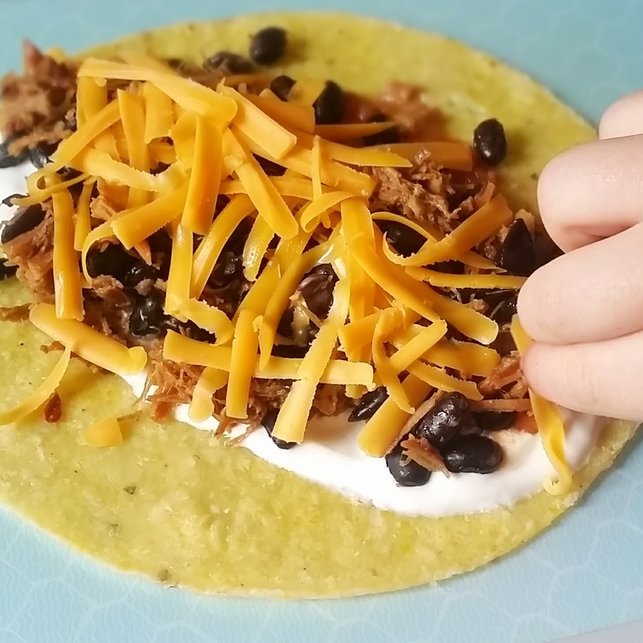
Eight hours later you will have perfectly tender meat that just falls apart when you touch it. I use ours in tacos and quesadillas, or over rice. You could also serve it on a bun or on nachos with your favourite toppings. We made tacos topped with salsa, sour cream, back beans, and cheese. Make sure you get the good stone-ground corn tortillas that don't have all the extra preservatives in them. We always keep a bag in the freezer. All of the extra meat gets pulled and frozen on a cookie sheet lined with parchment and then stored in the freezer for quick supper prep.
Enjoy! 
Get the recipe: Slow Cooker Pork Carnitas at Skinnytaste
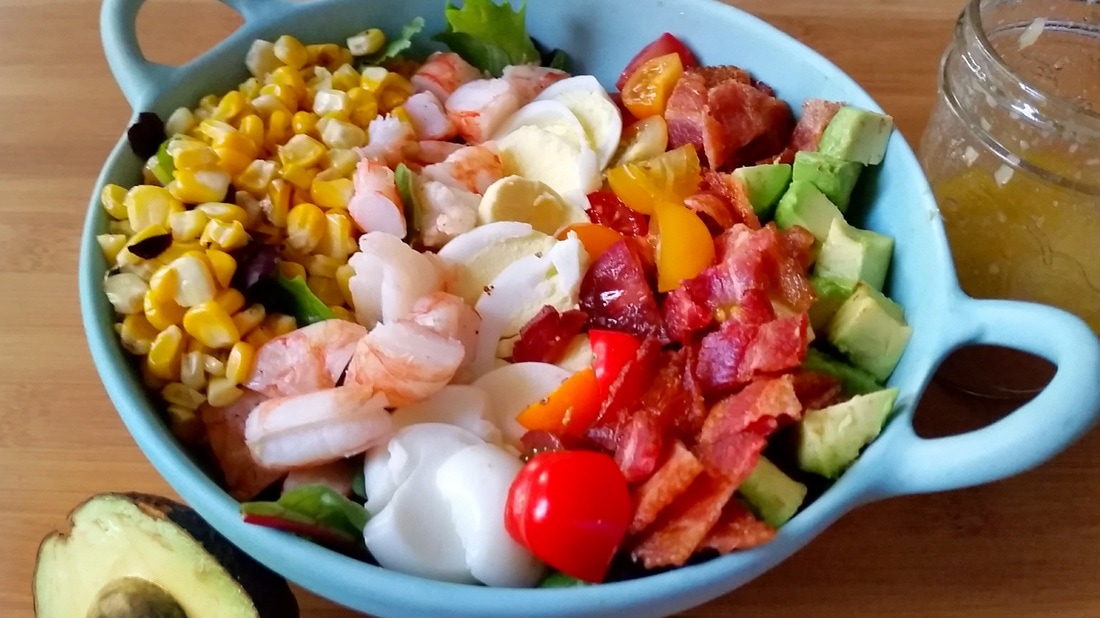
I tried to take my grill skills to the next level and got myself knocked down a peg. I was prepping to barbecue the shrimp and corn for this delightful salad from Skinnytaste when I thought, why not make this a trifecta and throw that bacon on, too? This, as it turns out, was not such a great idea. Those strips went from flaccid to charred in about 45 seconds and then stuck to the grates. What remnants were left, had more notes of charcoal than I care for.
Thank goodness I only cooked enough bacon for one night's salad. The following evening I went back to my tried and true method for bacon perfection. I think I picked this technique up from an episode of the Barefoot Contessa. It's seriously so easy. Just cover a baking sheet with foil, lay a wire baking rack across the top, and then arrange the bacon on the rack so the pieces aren't overlapping. This setup allows heat to circulate around the bacon so it gets crisp on both sides while letting the grease drip through onto the foil. And the best part? Clean up involves throwing away a piece of foil and placing the rack in the dishwasher. Boom. Mic drop. 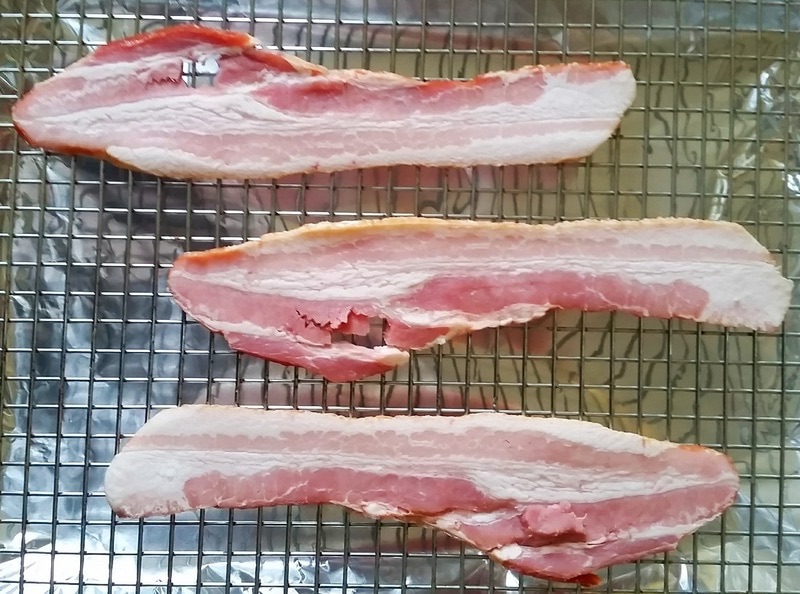
The original recipe calls for lobster but I could not find any at my grocers at the ready so I substituted shrimp. Nothing beats the freshness of a salad in the summer and this one definitely hits the spot. Give it a try and post your feedback below!

Get the recipe: Lobster Cobb Salad at Skinnytaste
One thing I get asked for a lot as a parent are my favourite family-friendly recipes. We caught a break with a toddler who continues to eat a wide variety of foods and flavours and who loves to try new things. Sometimes she spits those new bites right back out, but she is always eager to try. We have taken a very casual approach to mealtime and have given her the freedom to choose how much of what is served she will eat. This has eliminated the stress and constant bartering that many parents experience at the table and has allowed us to just enjoy each others company instead. We sing, we laugh, we visit. I love eating and visiting with my friends and family, so we try to create the same atmosphere around our table.
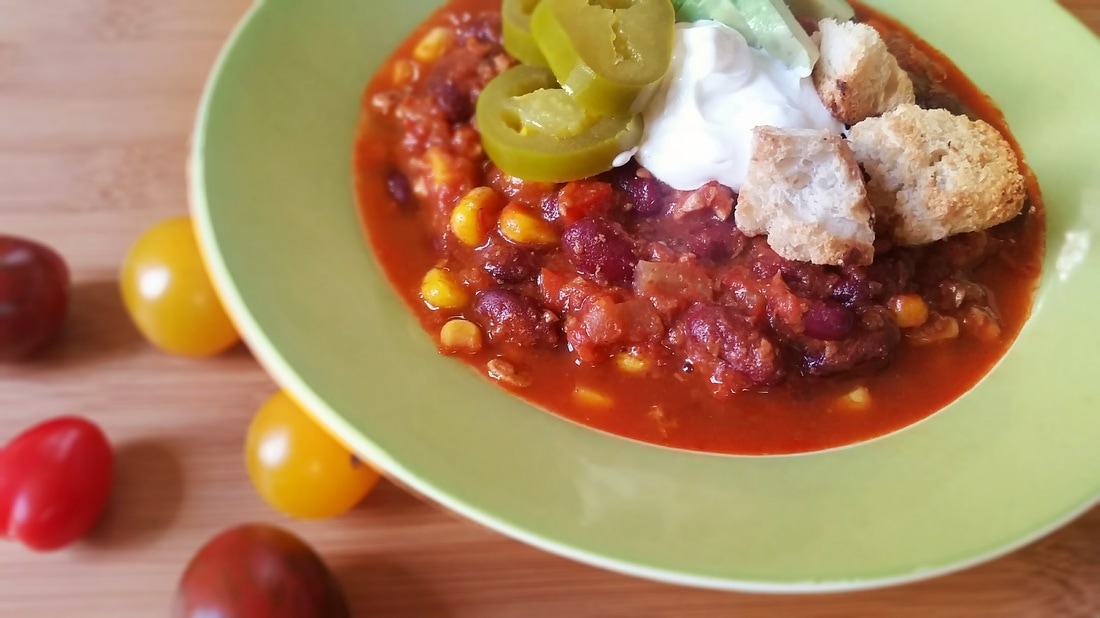
Right from the get-go, we exposed our daughter to a variety of flavours and textures. I was very fortunate to have the time and energy to make all of her food from scratch and I used the recipes and guidance from a really great cookbook I was given as a baby shower gift, The Best Baby Food. The recipes really do live up to the title. It was written by a dad of four/chef and a nutritionist so the author really knows his shit. By the age of one, my daughter had eaten more things than I have tried as an adult and every recipe I made, tasted good enough to have eaten myself. It was just plain luck that someone had chosen this book for me because it was a total winner and one I recommend to everyone. It was also during this time that I mastered the art of making and freezing portioned meals. This has been one of my greatest successes as a mother. And my recent purchase of silicone muffin pans in an assortment of sizes has been a real game changer. I was using my steel muffin pans to portion and freeze but unmoulding your goods from those pans is a pain in the ass. You either have to let them thaw a bit so they slide out which is messy, or you can try and loosen them with a knife and scratch all your good bakeware like I did. I strongly encourage you to skip that phase and get right to the good stuff. Now that my daughter is eating everything we eat, I use the regular size pans for freezing toddler-size sauce portions and the jumbo size for soups and chilis. I make large batches of everything I can to save me prep and cooking time later on. Then I replenish our freezer as needed and cook new things when I feel like it or have time. This has worked so well for our family and really makes mealtimes much easier. Last week we ran out of our favourite chili recipe from Ambitious Kitchen. It is also aptly named the "best" and does not disappoint. I double the recipe in my gigantic stock pot; it's a little excessive but the largest pot in my cookware set gets dangerously full to the brim. I swap the diced tomatoes for crushed for my husband who hates them and I use two cups of frozen corn instead of canned because canned veg give me the creeps. I've also grilled fresh corn and cut off the cob when I have time. I use ground chicken instead of turkey because it's usually what we have in our freezer from Cool Springs Ranch. Sasky folk, if you're looking for quality meat, give them a look. The Regina window for ordering is open now! 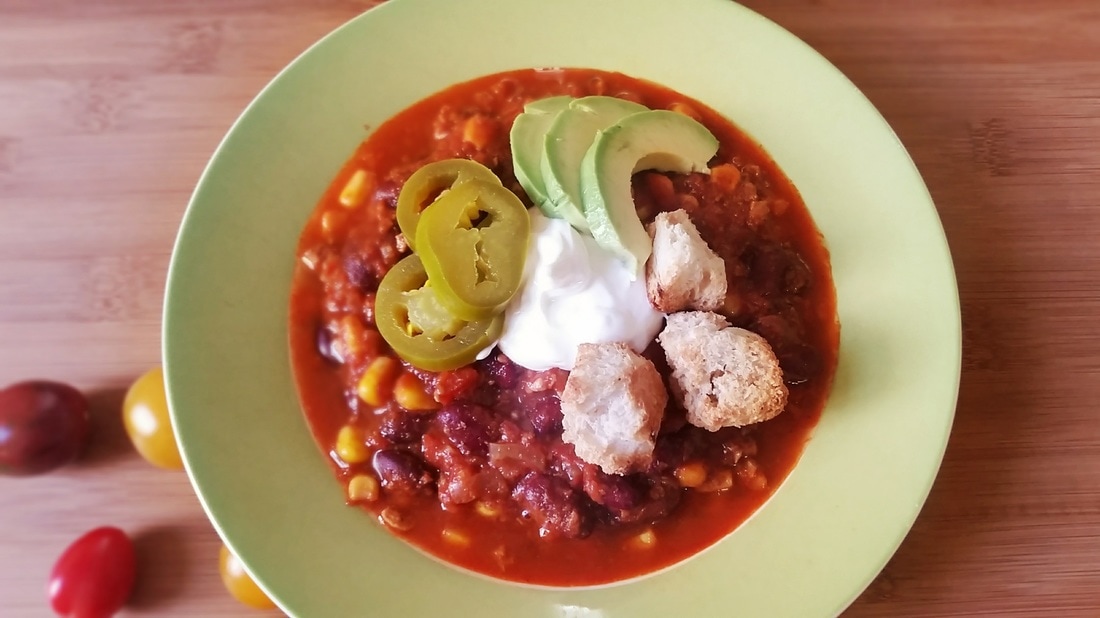
This chili has a Mexican vibe so you can top accordingly. I went with sour cream, a little cheese, pickled jalapeños, sliced avocado, and croutons. Crushed tortilla chips are also delicious. I don't find this to be spicy at all and my two-year-old gobbles it up, "kitty beans" included. Throw it on your menu for next week and let me know how you liked it!

Get the recipe: The Best Healthy Turkey Chili at Ambitious Kitchen
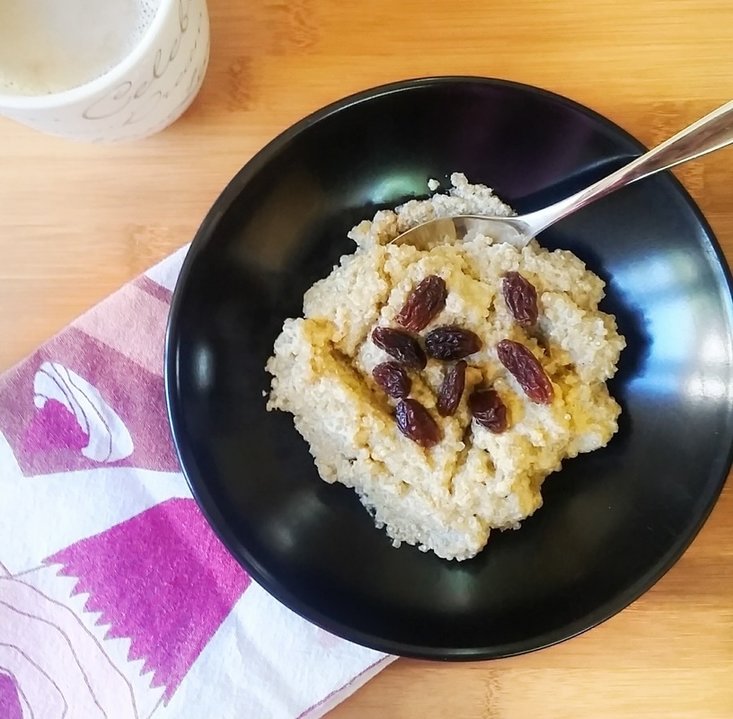
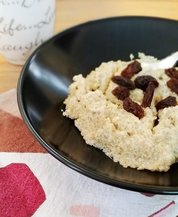
I try my best to provide a variety of options for breakfast throughout the week, but once in a while I still find us in a rut. This week was one of those times. So, I flipped through one of my favourite cookbooks, Quinoa 365: The Everyday Superfood. We eat a lot of quinoa in this house. Quinoa for lunch. Quinoa for supper. But quinoa for breakfast? You bet! It was one of the first cereals I made for Rowyn when she was starting on solids — we skipped the boxed rice in favour of more nutritious and delicious homemade options. It's a wonderful alternative to oatmeal and can be used in everything from omelettes to smoothies.
My daughter has a serious love of dried fruit so I picked a Raisin Pudding Breakfast Porridge to make. I halved the recipe for the two of us and used almond milk as that's all we had on hand. I also had to increase the cooking time at the end because the quinoa wasn't finished, so I would recommend cooking the quinoa for 10 minutes instead of the suggested 5. Otherwise, it was perfectly delicious and so easy to make. It's also family friendly, gluten-free, and vegetarian.
INGREDIENTS:
2½ cups (625ml) 2% milk 1 cup (250ml) quinoa ¼ cup (60ml) raisins 2 tbsp (30ml) maple syrup or honey ¼ tsp (1ml) ground cinnamon 2 large eggs ½ tsp (2.5ml) pure vanilla extract 1 tbsp (15ml) butter DIRECTIONS: Combine the milk, quinoa, raisins, maple syrup, and cinnamon in a medium saucepan. Cover the saucepan and bring to a boil, then reduce to a simmer and continue cooking, stirring occasionally, until the quinoa is tender, about 5 minutes. Beat the eggs and vanilla in a small bowl. Temper the eggs by whisking in 1 tsp (5ml) of the cooked quinoa. Repeat 7 times, whisking between each addition. Stir the egg mixture into the saucepan. Continue to cook on low heat until the mixture thickens, about 3-5 minutes. Stir in the butter and remove from the heat. Serve immediately. Serves: 4-6
After you fall in love with this recipe, you'll want to grab yourself a copy of this national bestseller by the quinoa sisters, Patricia Green and Carolyn Hemming. You'll find loads of delicious recipes and you'll finally get to use up that Costco-size bag of quinoa hiding in your pantry.

|


 RSS Feed
